| Grand Prix Racing - |
How To Make A Fast Pinewood Car |
Tool the Body
Out of the kit, your car body begins as a block of pinewood. It is too
heavy and too bulky to use as it is. Get a saw ready!
The goal is to make a light but adequately strong chassis from
the wood. A chassis is the frame of your car. You build the rest of your
car body on the chassis. Make the chassis light so most of your car's
weight can be added using free weights and positioned precisely. You can't
reposition weight if it's all tied up in wood. It should be possible to
make two chassis from the one block (one chassis of the two will need axle
grooves cut in it). Use one chassis as a backup.
Your free weight and body shell (if any) attaches to the chassis. Slots
may be needed in the chassis to anchor these parts. A well for placing
hammered lead into or melting lead into can be cut in the bottom rear of
the chassis. A well is not needed if you use heavy screws as free weight
(you may find you need more screws than you have space for!).
|
For the serious competitor
|
Dry wood contains more than 25% water by weight. Before cutting,
place your block in an oven at 325 degrees for a couple of hours.
This drives off some of the water; reducing the weight of parts made
from it. Weigh before and after. The difference in weight shows how
much water weight was lost. If you bake your car parts after they are
cut, check for warping of the parts. Don't bake sealed or painted
wood parts. They have to be refinished and less moisture would be
lost.
|
|---|
|
|
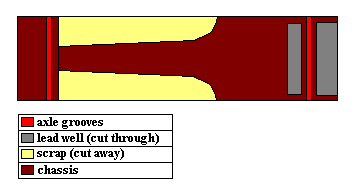
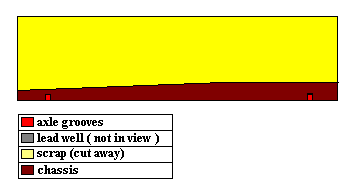
A chassis is the base of your car. It should be thin and have
space (a lead well) cut out to hold free weights and it has the axle
grooves cut in it. There are a number of physical reasons for a thin
chassis but some practical ones include the fact that thin pieces of
pine are more easily worked than a whole block at one time. A
whittling or pocketknife is all you need to change its shape or
contour. Cutting a lead well all the way through the chassis is
easier than trying to drill or chip it out of a block.
Other thin pieces (shaped panels) can be used to cap the lead well
and build up the sides and top of your car. With thin wall
construction, the car can have many air filled cavities so that the
weight is not tied up in wood bulk.
|
|
|
For the enthusiast
|
Using thin shaped panels cut from your block, you can make
detailed interiors, opening doors and hoods like your favorite
plastic models.
|
|---|
|
To cut out the chassis and axle grooves (if it's aligned well
enough), use a band or scroll saw. The chassis should be planed or
sanded with a rough 60 or 80 grit sand paper (by hand in a flat
holder) to give it straight lines and rounded contours. Rounding off
edges often adds a nice touch. Be careful working around thin
outcroppings, they can break. If they do, use wood glue to join them
better than before.
Alter the shape of your chassis to your liking, but keep the nose
squarish because a narrow tip may not trigger an electronic timer
right away. Each quarter of an inch counts at the finish line!
|
|
Note that many kits come with grooves for the axles already cut. If you
can not "move" your axle slots to take advantage of a wider wheel base then
you should at least check to see if they are straight.
- Get a carpenter's square, drafting triangle or something you know is
really "square".
- Turn the block on its side on a table.
- Place one edge of the square flush with the table and pressed flat up
to the block.
- Move it along the block until the other edge is along a groove.
- The edge and the groove should be parallel. If they are not, cut new
grooves on the opposite side of the block.
|
Recommendation for most tracks
|
Design your car so the weight is very near the rear axle but make
sure you extend the wheelbase as far as possible. If you do not, the
car will likely zigzag down the track nullifying any advantage!
|
|---|
|
However, if you do not have access to an accurate miter saw, making any
of these cuts could result in misaligned wheels. Ask your parent or leader
to assist.
|
For the tool deprived
|
One way to get around "perfectly" square axle slots is to cut them
half again as wide as the axle. This gives you "wiggle" room to align
your axles perfectly when you glue in your axles (hot glue is
recommended). You can also use thin wedges of wood (shims) to help
align them, though it requires more patience.
|
|---|
|
|
For the serious competitor
|
Raise one front wheel and "steer" with the other to get a
perfectly straight run. To "steer" the touching wheel, cut the front
axle groove wider than the axle so you can turn it a bit while the
hot glue is cooling. See the details on the page about putting the wheels on.
|
|---|
|
To figure out how big the well for your weight must be, weigh your
chassis, other car parts and buffer weight. A buffer weight is a
small amount of weight (usually clay or lead chips) that is easy to remove
from and add to the lead well or other hollow place of your car. Add the
buffer weight on the worksheet in the link below if you think your car will
be overweight. If under, just make room to add it at the competition. Use
the worksheet to determine how much lead
weight will be needed. (click the "back" button on your browser to
return here)
- For hammered lead weight: just measure the base of
the weight and its depth.
- For melting your lead weight: find its volume from the table in the link and determine its shape as described there.
If you decided not to use a chassis, cut the well using a drill or
carving tools. If you made a thin chassis, fill it with lead and cap it
with a body shell. The fit between the chassis and shell must be good to
keep lead from leaking out from between them if you pour it. Get assistance
when working with tools.
|
For the very careful enthusiast
|
Use a scrap piece of wood cut to fit the top of your lead well.
Abut it to another scrap to cover the open back of your chassis and
to a third piece to cover the open rear, bottom of the lead well. Tip
the chassis as necessary to pour lead through the opening in front of
the rear axle. It will fill in the back of the lead well first making
a smooth block.
|
|---|
|
| Grand Prix Racing - |
How To Make A Fast Pinewood Car |
| Copyright © 1997, 2000, 2001, 2002, 2004 by Michael Lastufka, All rights reserved worldwide. |

