| Grand Prix Racing - | How To Make A Fast Pinewood Car |
Wheels from different kits have a few important differences. For the most part, they can be prepared in the same way. However, the different types of plastic and the molding processes used dictate that some kit wheels need more work than others. For best results, get access to an electric drill and have some fine sand paper (220 grit) and lintless paper or cloth ready. A hobby knife will be used first.
Kit wheels most often come with little pieces of plastic still attached from the molding process. Carefully cut this molding flash off, using a hobby knife. Try to get a straight clean cut that is as flat as the rest of the surface. You can carefully plane off slight ridges in the plastic by cutting at a grazing angle. Do not apply much force when cutting at an angle or the knife could slip and cut you. Instead, rock the blade slowly along its edge to move it forward.
| BSA: Get help from an adult to cut off the beads from around the outer edge of the Boy Scout wheels. It takes a good grip on the hard plastic wheel and steady thumb action with a hobby knife. The next best thing is to try to sand them off in the next procedure. The rumble you hear from beaded wheels is the sound of increased tread friction! |
|---|
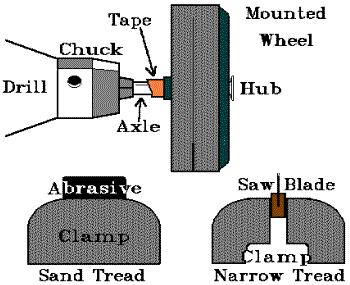
Now, mount each wheel on an axle or mandrel drill attachment as described below. Our purpose is two-fold. First, we want to check the roundness of the wheel and correct gross deviations. Second, it is good to sand the edges of the tread round if they are sharp. The inner edge of the tread will be rubbing the lane median and the outer edge will follow wood grain in the track if left sharp.
Get some help in mounting and sanding the wheels with the drill. An improperly mounted axle or mandrel attachment can be dangerous.
|
For the Novice
|
For some kit wheels this step is the difference between fast cars and very fast cars. Inspect the wheel bore (the hole the axle goes in) with a high power hand lens (like 10X).
| AWANA: Most AWANA wheel bores contain a forest of scrapes and stress flakes left from the molding process. |
|---|
| BSA: BSA wheel bores appear highly polished. A few do sport gross irregularities. |
|---|
This procedure can leave a mirror polish. Dimples in the bore won't be helped. If there are plastic filaments in dimples, raise that wheel to reduce its impact on speed. Try to get new ones if this happens on more than one or two wheels.
To polish (more accurately - burnish) your wheel bores, you'll need a polished, thin metal rod, awl, or needle-nose tweezer. A polished axle can work if you can get a good enough grip on the two ends with a wheel between. With the right implement, a child can easily do this.
Some clubs' kit wheels have raised lettering molded on them. This is the time to paint that lettering for a professional racing look. All you need to do is dab a toothpick in a bit of acrylic paint, and carefully touch the top of the lettering with it. Don't let the paint wet the sides of the letters or it will smear. But, if paint goes astray, just tweak it off with the dull edge of a hobby knife.
Some Grand Prix "drivers" prefer to sand off the lettering altogether. Do this if your organization's Grand Prix track does NOT allow enough space between lanes. Wheels from neighboring cars CAN rub together! Aerodynamic drag, however, is NOT a good reason to sand off the lettering. It's effect has yet to be measured!
Often times, this procedure is disallowed by Grand Prix rules. The reason may be related to safety since many aspiring auto builders may employ dangerous methods to cut the plastic wheels. A slip of wheel under the pressure of a hobby knife could be very painful, possibly with permanent consequences.
You need to exercise care following this procedure. If done properly, your wheels will roll more easily. It will be as if your car only had two wheels! You will need a drill, small saw (coping, hack, drywall, etc.), and a vice. Don't do this procedure unless you use a vice or other holder to keep the saw from slipping. Get your parent or leader to supervise.

| [Next Section] | [Title Page] |
| Grand Prix Racing - | How To Make A Fast Pinewood Car |
| Copyright © 1997, 2000, 2001, 2002, 2004 by Michael Lastufka, All rights reserved worldwide. | |