| Raingutter Boat Racing - |
How To Make A Fast Regatta Boat |
How To Build a Paddleboat
Paddleboats are fun, but they are challenging to build. It will take
longer to make a paddleboat too. Before you commit to making one, try
making a paddle wheel. If it works out well, then proceed to build the
paddle wheel housing and finally the rest.
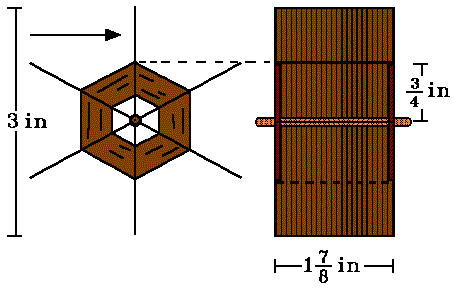
A paddle wheel is a simple device. It is easiest to construct one with
an even number of veins or blades sandwiched between two disks. A dowel is
used as the hub.
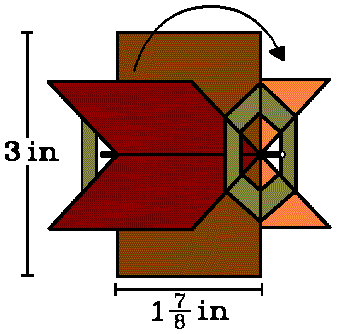
Improvements on the paddle wheel include making triangular slits near
the disk centers to let air escape through the housing vent. Viscous water
drag is also reduced by the slits when the paddle is spinning. The length
of these slits outward from the hub may only be a quarter inch.
When wood is used, the disks can be replaced by spanners.
Spanners are wood strips that hold the veins apart. Viewed from the side,
they form a hexagon if six veins are used, an octagon if eight are used.
The wood grain runs the length of each spanner for strength. The paddle
wheel instructions given here use spanners.
Though a paddle wheel can be built out of stiff plastic (from an
ice-cream container lid or similar) these instructions will describe the
construction using a thin light wood like 3/32 inch thick balsa. Some
regulations may allow only wood and paper materials to be used for
non-ornamental boat parts. The paddleboat described here is probably not
the "best" possible design. It is meant as a starting point for your own
design.
- Trace 12 spanners. Each has a 3/4 inch top centered over a 3/8 inch
bottom. Each is 3/8 inch tall. The sides slope at 30 degrees.
- Cut the spanners out using a sharp
exacto knife.
- Draw the desired number of rectangular veins 1.5 inches long and 1
7/8 inches wide on a piece of 3/32 inch thick balsa.
- Cut the veins out.
- Cut a 3/16 inch diameter dowel to 2 1/8 inch length.
- Stack all veins and sand square together. Hold together with masking
tape while sanding the edges.
- While still stacked, press a piece of good thin masking tape across
the root edges of all the veins. Remove any tape sticking out around the
vein roots.
- Test wrap the taped root edges around the axle. They should fit
tightly with no gap. Sand the axle thinner if there is a gap.
- Sand the sides of each down if they are too "fat".
- Glue the vein root-tape to the axle.
- Test fit spanners and adjust.
- Glue in spanners on one side of the paddle then the other.
- With a tooth pick, apply extra glue around all vein joints.
- Grease the edges of the spanners and veins with wood glue.
- Cut or sand the ends of the axle to rounded points. They should
protrude from the paddle wheel about an eighth inch on each side.
- Paint and coat the paddle wheel with a liquid plastic so it is
water-proof. Wipe the excess off the axle points. When dry, the tips can
be waxed by rubbing softened paraffin on them.
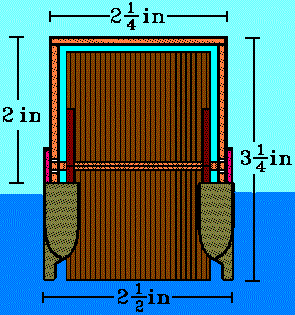
The paddle wheel is held above the water by a hub. A housing with an air
inlet pressurizes blown air. Hub caps hold the paddle wheel axle in the
housing and helps insure best spin. The size of the housing is 1/4 inch
more than the paddle wheel to allow good clearance and to reduce viscous
water drag.
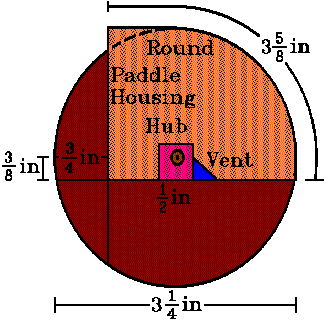
- Mark a 3 1/4 inch diameter circle on a piece of cardboard using a
compass so the center is clearly marked.
- Mark at the center, a 1/8 inch diameter circle.
- Draw a line (called a chord) 3/8ths of an inch from the center across
the circle. In the following instructions, use the larger piece of the
circle, it will form the pattern for the sides of the paddle housing. The
flat side of this piece is its "base".
- Draw a line at right angles to the base 3/4 inch from the center.
Extend it across the side of the housing side pattern. This line marks
the rear of the housing.
- Draw a line at right angles to the base 1/4 inch in front of and
below the center down to the base.
- Complete the vent triangle by drawing a line from the upper end of
the previous line to a point about 1/4 inch in front of the previous line
on the base.
- Cut out the housing side pattern including the center hole and
triangular air vent.
- Using the pattern, draw two housing sides on 1/8 inch thick balsa.
Line up the rear of the housing along the grain of the wood. Be sure to
copy the vent and axle hole.
- Cut out the housing sides. The arched edge of each housing side is
called the "round".
- Place the two housing sides together so the edges, center holes and
vents all line up.
- Sand the edges and holes until they are identical, being careful to
preserve the shape and size as much as possible. The paddle may not spin
freely in the housing if the size and shape of its sides are altered too
much.
- Use a flexible ruler or tape measure to find the arc-length of one
round; about 3 and 5/8 inches.
- Cut a rectangle measuring 2 1/8 inches wide and as long as the
arc-length you found in the previous step on 3/16 inch thick balsa. Make
sure the grain runs across the narrow width of the rectangle so it can
bend over the round. This will cover the round.
- Smear a SMALL amount of wood glue on the front of each housing side
right where the round begins. Try not to get any glue on the base.
- Press the edge of the round cover against the glue on the front of
the housing sides.
- Hold the pieces so the bases of the sides are at right angles to the
narrow edge of the cover and flush with it. The cover should not be
sandwiched between the sides, but in front of them. The cover should
stick straight out, don't try to bend it over the round yet.
- Let the joint dry.
- Smear a LITTLE glue on the rest of the round edges.
- Carefully bend the cover over the rounds. The edge of the cover
should not overhang the round on the outside, but be flush with it. If
there is an overhang, the paddle may not spin freely in the housing.
- If the cover does not bend well or starts to crack, wipe off the
glue, and set to steam on a rack over boiling water (outside toward
steam). The wood will bend toward the round after a minute or two.
Remove, glue and finish bending.
- Use pins spaced every inch to hold the cover on the round until it is
dry.
- Smear more glue on the inside and outside of the round joint.
- Finish the inside of the housing including the hole and vent so they
are water-proof. Wax these areas also. Avoid getting finishing compounds
on the edges and outside of the sides.
- Cut two 1/2 inch squares out of 3/32 inch thick balsa.
- Glue them over the axles holes on the outside of the housing just
beyond the vents. These are the hub caps for the paddle wheel.
- Finish the inside of the hub caps. These areas should be
water-proof.
- Carefully fan open the housing rear to fit the paddle wheel into the
hubs.
The housing is ready to be mounted on a suitable hull and finished.
Congratulations if you were able to follow all these instructions! Now you
know why God did not ask Noah to build a paddleboat!
You can put a paddle wheel on either a split hull or a flat hull. Since
the split hull is described in the construction instructions for the
catamaran and a good flat hull is described for the hydroplane, only the
differences will be listed here.
A Split Hull for a Paddleboat
- The size of the pontoons are generally 6 inches long, half an inch
wide and 1 inch tall. The rear of the pontoons can be made narrower to
allow for a wider paddle wheel. The tallest part of the pontoon should be
about half an inch behind the center of its length.
- Cut the pontoons from a light wood with the grain along their length.
Two or three thin pieces of wood may be cut to the same shape and glued
together (laminated) to produce each pontoon. If one piece is made
shorter, a wider paddle wheel and housing can be fit to the hull.
- The pontoons should be rounded like a bullet in the front and swelled
in the back to cover the bottom of the paddle wheel.
- Make the deck is about 1 inch long, 2.5 inches wide and an eighth of
an inch deep.
A Flat Hull for a Paddleboat
- Make a flat hull about 1/2 inch deep. The floating water line or
draft will be about 3/8 inch.
- The nose should bend up gradually to about a 30 degree angle. This
helps to minimize the effect of a reflected wave if the boat stalls near
the end of the gutter.
- The front of the hull should be square. A "v" shaped nose will tend
to make the boat tilt to one side or the other and turn to the side.
- Cut a rectangle about 2 1/2 inches long and 2 inches wide from the
rear of the flat hull to accommodate the paddle wheel.
| Be sure to water-proof surfaces exposed to water that can't be reached with the paddle housing and wheel installed. |
|---|
|
Placement of the balance point is a key to the success of a paddleboat.
Too far forward and the nose will bury itself in water. Too far back or
high and the boat wants to wheelie the whole race or worse yet, flip over
backwards!
- Make the weight of the boat as near the lower limit of legal weight
as possible with your materials. The harder you can blow, the heavier
your boat can be, but it will be slower than it would have been if it
weighed less!
- Place about an ounce of weight near the forward edge of the short
deck. The nose tilts up a few degrees.
- Place the weight low in the hull to increase sideways stability, but
it is more spectacular if you tie up your weight in deck sculptures or
thematic structures.
| Raingutter Boat Racing - |
How To Make A Fast Regatta Boat |
| Copyright © 1997, 2000, 2001, 2004 by Michael Lastufka, All rights reserved worldwide. |


