Raingutter Boat Racing - How To Make A Fast Regatta Boat

A Simple Hydroplane Hull

A fast Raingutter Regatta boat can be built from cheap, easily crafted materials. If your kit does not contain materials like foam board, thin balsa and birch work best. Dowels and sail cloth are no match for rigid sails made of foam, cut styrofoam cups, card stock or plastic.

BSA: If you have a Boy Scout kit, check with your regatta coordinator about your options. You will want to make your boat more like the simple hydroplane described here.

For easiest crafting, make your hull from a 1/2-inch or 3/4-inch thick piece of insulation foam board. You can easily shape this using a serated knife and sandpaper. Separate pieces of thin wood stock, like balsa is the next best. If you must use a block, have it cut it up into thin pieces. You will have much more control over shape and weight.

No matter what your hull is made of, your raingutter regatta boat requires some up front design. If properly constructed, you may be able to blown it across a ten-foot, water-filled raingutter in less than 3 seconds.

Preparation

Materials Tools  
  • Foam 1/2 x 6 x 2.5 inches (hull)
  • Foam 1/2 x 3.25 x 2.5 (sail top)
  • Foam 1/2 x 1 x 2.5 (sail back)
  • Rectangle 2.75 x 3.5 plastic lid (sail sides)
  • 2 rectangles 0.5 x 1 plastic lid (bumpers)
  • Small amount of weight (5 pennies)
  • Water-proof glue (Best)
  • Hot melt glue (Be careful)
  • Hobby or serated knife
  • Siscors
  • Sandpaper (180 - 320 grit)
  • Masking tape or "scotch" tape
  • 3-inch clamps (or fingers!)
Foam hull with transparent sail sides


Assembly

Substitutions: Thin wood may be substituted for the plastic parts. If you wish to make your hull entirely of thin wood, see the balsa kit instructions.

Foam hydroplane parts - not to scale

These steps show how to make a simple, fast hull in about 2 days. Feel free to alter the design. Make and finish as many of your deck-o-rations as you can before attaching them to this hull. Make it light, blow it right and the bottom of your hull skims the water surface at great speed. Note the optional steps.
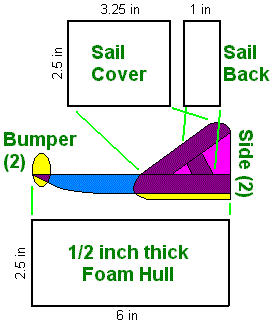
  1. Draw your boat side view on graph paper to actual size. In this design, the sail sides and bumpers extend down below the hull bottom to form runners. If you have enough plastic or wood, make the bumpers and sail sides one continuous part on each side. Then the runners will extend the length of the hull.
  2. Using a knife, sculpt the curve in the front of the hull piece. Hold the foam upside down. Start about 2 inches from the front at a glancing angle with the knife oriented along the width of the foam. A steady sawing motion helps cut an even depth across the width. Slowly turn the knife downward toward the top of the foam. Exit the knife about 1/8 inch from the top of the foam (which is facing downward).
    A flat bottom turned up in front helps the boat jump to the surface of the water when blown.
  3. Bevel (cut a slant) the front edge of the sail top according to your drawing. When glued to the hull top, it slants upward to the rear.
  4. Bevel the bottom edge of the sail back according to your drawing. When glued between the hull top and sail top, it slants upward to the front.
  5. Cut the rectangle for the side pieces along a diagonal to make two sides. Round up the edges and trim according to your drawing. In the diagram at the right, the one shown is a purple, translucent, rounded triangle including the yellow runner at the bottom.
  6. Cut the rectangles for the bumpers into ovals or according to your drawing.
  7. Glue the sail top to the top of the hull so it is even with the end of the hull. Hold it in place with tape. Curl the end of the tape to stick to itself - that gives you a "tab" to pull it off later.
  8. Glue the sail back between the top of the hull and the sail top. Prefit to make sure the bottom bevel fits the hull top and the "square" end fits the sail top well. Hold it in place with tape.
  9. When dry, remove all tape and (Optional) add more glue to the new joints.
  10. Weigh hull, sail sides, bumpers and deck-o-rations - anything you will put on it. If they total less than the allowed minimum weight, add weights evenly across the gap between the sail top and sail back. Pennies fit by friction. Otherwise, secure with glue (hot glue makes this very quick).
  11. Roughen up contact areas with sandpaper and glue the sail sides in place and hold with rubberbands, clamps or fingers.
  12. Roughen up contact areas and glue the bumpers in place. Hold with clamps or fingers.
[Next Section] [Title Page]

Raingutter Boat Racing - How To Make A Fast Regatta Boat
Copyright © 1997, 2000, 2001, 2004 by Michael Lastufka, All rights reserved worldwide.