| Raingutter Boat Racing - |
How To Make A Fast Regatta Boat |
Balsa Raingutter Boat Kits
Your raingutter regatta boat requires some up front design in addition
to assembly. If properly constructed from this kit, it may be blown across
a ten-foot, water-filled raingutter in less than 3 seconds.
| Materials |
Tools |
- 1 piece balsa approx. 1/8 x 6 x 18 inches
- 2 index cards (sail)
- Acrylic, enamel or spray paint (not in kit)
- Small amount of weight (not in kit)
- Clear polyurethane coating (not in kit - optional)
|
- Wood glue (Recommended)
- hobby knife
- Masking tape or "scotch" tape
|
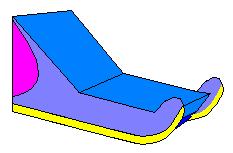
In general, a fast hydroplane hull is constructed like a box. A flat
bottom turned up in front helps it jump to the surface of the water. Be
sure to "Deck-o-rate" your boat for the design competition. Please note the
optional steps. It will take at least 2 days to build a good boat. Use good
cutting techniques to cut the wood
pieces.
These steps show how to make the simplest, fast, balsa hull. Feel free
to alter the design. Be mindful of the effect of changes on speed. The
steps below approximate a curved-up bow using two flat plates. Building
this way is easier than bending it and the speed is not reduced. Design
bumpers into the bow and the sides of the sail into the stern as shown, or
make a taller hull. When floating, a one-ounce kit-boat sinks about an
eighth of an inch (draft). Blow it properly and the bottom of your hull can
skim the water surface at great speed.
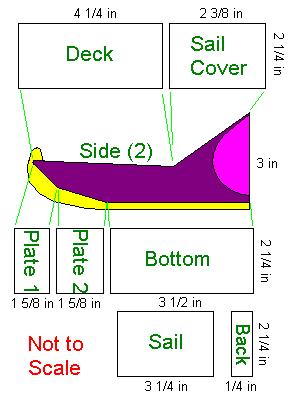
- (Optional) Pick a theme. Draw a boat side view on graph paper to
actual size. Runners should overhang the sides 1/4 inch beyond the bottom
of the hull.
- Cut out the side pieces, flat bottom and the two bow plates of the
hull from your balsa sheet. Balsa should be cut with a hobby knife
(recommended), but a good scissors will work except for tight curves. Use
your drawing as a pattern.
- To glue these hull pieces together, prefit them, tweak them, glue
them and tape them together loosely until dry. Check corners with
something "square".
| Just a little wood glue immediately bonds the wood. When dry, apply more glue on the inside of the joint to strengthen. |
|---|
|
- Cut out the back part of the hull, the deck and the sail cover.
- Glue them on, holding them in place with tape.
- When dry, remove all tape and add more glue to the new joints.
- Weigh hull, sail material and deck-o-rations. If they total less than
an ounce, add coins or weights inside your hull. Secure with glue.
- After narrowing the card to fit the back of the boat, bend it into
the openning to see that it fits well. Tweak it if necessary to improve
the fit.
- With the card where you want it, apply glue with a toothpick or thin
brush to the edges of the sail. Add more later. Be sure to paint over
these joints so water does not penetrate the sail and make the paper
soggy.
- (Optional) Add deck-o-rations.
- (Optional) Coat with sanding sealer. Sand when dry. Repeat for a
smooth finish.
- Paint with paint that is not water soluble when dry (unless coating
with polyurethane).
- (Optional) Coat with polyurethane. Allow a day or two to dry
completely.
- (Optional) Rub hull bottom with warm paraffin or ski wax.
| Raingutter Boat Racing - |
How To Make A Fast Regatta Boat |
| Copyright © 1997, 2000, 2001, 2004 by Michael Lastufka, All rights reserved worldwide. |