| Lastufka Labs - | Reference |
A parachute helps cushion the fall of whatever it's attached to, providing it's big enough. Though they have many hobby uses, parachutes are perhaps most commonly used to return hobby rockets safely to the ground or plastic figures released from kites or merely thrown into the air. A car might also have a mechanism to deploy one at the end of a race to slow it down.
If the parachute is used in the open where wind can affect it, thought must be given to reducing the size of the parachute. One suitable in calm conditions may be blown far down range in a breeze. Reducing its size will allow a faster fall without as much drift. Unfortunately, a faster fall is harder on landing.
| Object Weight (oz) | Diameter (in) |
|---|---|
| 0.5 | 12 |
| 1 | 18 |
| 1.5 | 22 |
| 2 | 25 |
| 3 | 31 |
| 4 | 36 |
| 5 | 40 |
| 8 | 50 |
| 12 | 62 |
| 16 | 72 |
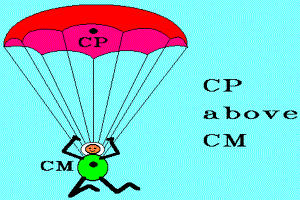
A parachute is a rather flexible "wing" anchored from its edges to a weight that freely dangles below it. The chute creates pressure drag. This drag pushes on the chute as if it were all concentrated in one spot at the center of the chute's volume. This point is called the center of pressure (CP). It is the point at which air pressure is balanced inside the chute.
What makes a parachute work is that the air filling the chute always pushes the center of pressure to move above the center of mass (CM). The center of mass is usually in the middle of the weight (chutes can be very light). The weight may swing a bit, but never enough to rise above the center of pressure on its own.
You could force such a situation by swinging the weight hard so it rises above the center of pressure, but it always drops down again. If it passes over the middle of the chute, it may collapse it and cause the whole thing to come crashing down!
| [Back] | [Central Console] |
| Lastufka Labs - | Reference |
| Copyright © 1998, 2002 by Michael Lastufka, All rights reserved worldwide. | |