The Any Rubber Band Shooter
We came up with this simple design for one of our first family Thanksgiving Turkey Shoots in the early 90's. The "Any" Rubber Band Shooter has proven to be more flexible, durable and acurate than our other designs sporting triggers and other "acuracy" improvements. We hope you have as much fun making and using them as we have.
Materials
- Firring strip
- Pine 1.25 x 3/8 x 14 inches for grips
- Firring strip
- Pine 0.5 x 3/8 x 12 inches for the rail (can cut a wider firring strip in half)
- Wooden clothes pin
- Used for the rubber band trigger
- Firring strip or wood scraps
- Cut to desired target base and upright sizes
- Angle brackets
- 2 metal brackets for target base
- Heavy wire
- From clothes hanger or lampshade for target
- Beads
- 4 large smooth beads for target
- Corrugated Cardboard
- Cut to fit target base
- Paper clips
- 3 paper clips for target
- Wood glue
- May also need sand paper, a file or a hand saw
- Drill
- Electric or hand drill for holes in target upright
- Needle nose plyers
- Electric or hand drill for holes in target upright
- Paint
- For finishing the shooter and targets
Put It Together
Though it is a unique design, this is an easy shooter to assemble and decorate.
Build it:
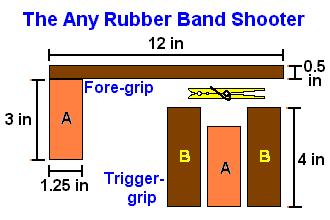
- Carve a "7"-shaped slot at one end of the rail for an anchor slot.
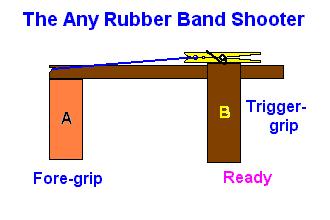
- Cut the 0.5 x 3/8 x 12-inch firring strip into two 3-inch long pieces (A in the diagram) and two 4-inch long pieces (B).
- Glue one of the 3-inch pieces under the anchor slot end of the rail. This forms the fore-grip.
- Glue the other 3-inch piece between the two 4-inch pieces. All three pieces must be flush (lined up) at one end. This forms the trigger-grip.
- Glue the clothes pin in the slot in the top of the trigger-grip. The slot may need to be carved or sanded wider near the top to fit the clothes pin and its spring. Wood glue holds all the parts together very well.
- After all parts are dry, fit the rail into the slide hole near the top of the trigger-grip. If the fit is too tight to slide smoothly, sand or file the rail.
- Paint all but the rail with acrylic paint.
Make resetting targets:
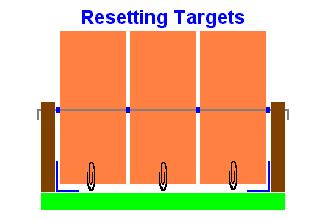
- Drill a hole in each base upright, centered near the top. The wire will pass through these holes.
- Using the angle brackets, form the target base using wood adjusted to the size you desire for the base and uprights. The uprights are more than half the height of the corrugated cardboard targets.
- Cut three corrugated cardboard rectangle targets making sure the corrugations run across the width. Their width is one-third the inside width of the base minus the width of 4 beads.
- Decorate the targets as desired. For our Thanksgiving Turkey Shoot, we draw and paint turkeys on separate pieces of thick paper and glue them on to the targets. Coating the targets with a finish helps keep them nice for years.
- Cut the length of stiff wire at least an inch longer than the outside width of the base.
- Drive one end of the wire through a center corrugation of each target to test fit. Remove the wire from the targets.
- Bend half an inch of one end of the wire at a right angle.
- Start the wire through one of the uprights. Put a bead on the wire followed by a target, a bead, a target, a bead, a target and a bead.
- Thread the wire through the other upright. Make sure the targets rotate freely. Bend the wire that sticks out down at a right angle.
Shooting Rubber Bands
The best feature of this rubber band shooter design becomes obvious when it is time to shoot. You can shoot virtually any size rubber band! But if you like your rubber bands by the numbers, number 32 (3-inch) or 33 size rubber bands work very well. A bonus is that almost any age child can easily learn to load it by themselves.
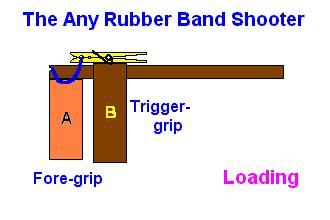
To load the shooter:
- Slide the trigger grip to the fore-grip.
- Clip a rubber band in the large clothes pin slot.
- Slot the other end of the rubber band in the anchor slot.
- Grip the fore-grip with one hand.
- Pull the trigger-grip back with the other hand leaving the clothes clip untouched.
To shoot the rubber band:
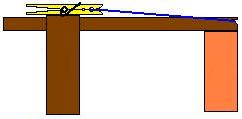
- Sight from the near end of the rail to the front.
- Aim the shooter a little higher than line-of-sight.
- Place a finger lightly on the trigger-clip while remaining very still.
- Press down on the trigger-clip while holding your breath momentarily.
- Adjust your aim as you become familiar with the shooter.
| Good Advice: Never point the rubber band shooter at any person or animal! |
To increase the "impact" and get a "whiz" out of your shots, pull one side of the rubber band tighter than the other when loading. The easy way is to allow slack only on one side when loading and hold the rubber band ends in the anchor-slot and clip when pulling. This works when shooting by hand as well.
Scriptural Analogy
After we personally accept Jesus as God's solution to our sin problem, He wants us to grow in our knowledge and experience of Him in our lives. To do this, He often challenges us to stretch! In prayer, Bible reading and thinking about Him, He often brings situations to mind where we need to change to think and act more like him.
It is hard work to be stretched in this way because pride, habbits or selfish desires hold us back. Only when God stretches us, can we hit the target He aims us at to show others His love. If we cannot stretch much, we will only be good for hitting close, "easy" targets or we might even get broken!
It is hard for us to fix a broken rubber band, but God is always able to fix us if we let Him.
I know what it is to be in need, and I know what it is to have plenty. I have learned the secret of being content in any and every situation, whether living in plenty or in want. I can do everything through Him who gives me strength.
Philippians 4:12-13 |
Copyright © 2002 Michael Lastufka, All rights reserved worldwide.